Use Cases
Engage customers based on their location with Radar, Braze and Amplitude


When we think of delivering personalized experiences to customers, the use cases that often come to mind are digital and on-platform. But some of the most meaningful interactions between brands and consumers are those that allow customers to take advantage of offers and experiences in the real world, in real time––not just in an app or on a website.
When leveraged thoughtfully and in a privacy-compliant manner, location-based customer engagement can serve as a powerful tool in a brand’s customer engagement toolkit.
Executing location-based engagements effectively is challenging, however, as it requires not only acquiring accurate geolocation data from customers, but also executing on this information in real time. In this use case, we’ll take a look at how mParticle’s pre-built, codeless, real-time integrations with Radar, Braze, and Amplitude can be used to engage users based on their location relative to a physical restaurant or store.
Let’s dive in!
Step 1: Implement mParticle’s SDK in your mobile application
In this use case, we will be collecting users’ location data via an iOS app, so implementing the mParticle iOS SDK will be the first step in the process.
Step 2: Implement the Radar location SDK
We’ll also be using Radar for location tracking in an iOS app. Radar’s location tracking functionality requires Radar’s SDK to be included in-app. Thanks to the concept of “kits” within mParticle’s mobile SDKs, however, we can add any SDKs required on the client without having to go through a full-implementation process.
mParticle kits contain a special wrapper function that maps data collection methods on partner’s SDKs to the analogous mParticle method. By using the mParticle-Radar kit, we can track location changes near a specific geofence by simply adding the kit in the iOS application through Cocoapods/Carthage and running ‘pod install’.
Step 3: Set up the mParticle Braze integration
Once we’ve collected geolocation events from our users, we’ll be using Braze to send emails and push notifications in real time. Setting up the integration between Braze and mParticle is a simple UI workflow that non-technical teams can accomplish following these steps:�
- Open the integration directory in the mParticle app
- Search for and click on Braze
- Click “Setup” > “Audience Output” > “Configure”
- Enter a configuration name and your Braze API key
- Click “Save & Open in Connections”
Demo: Set up Braze integration in mParticle
Step 4: Set up the mParticle Amplitude integration
Once our geo-targeting campaign is underway and we’re sending location-based emails and push notifications to our users, we’ll leverage Amplitude to do further segmentation and analysis on our audiences. Setting up the integration is similar to that with Braze, only this time, we’ll be configuring an event output:
- Open the integration directory
- Search for and click on Amplitude
- Set the “Input” field to “Event” and click “Configure”
- Enter configuration name
- Enter information relevant to your Amplitude instance
- Click “Save & Open in Connections”
Step 5: Activate connections between mParticle and partners
Once integrations are set up, mParticle enables you to control how data is forwarded to each downstream tool. Analogous to “traffic control,” these connections serve as instructions which can direct any available data inputs to these partners based on specific forwarding rules. Marketing and product teams can define these no-code rules without the involvement of developers. Follow these steps to create connections for each integration that has been set up:
- Click on Connections
- Select an input (for ex. iOS)
- Click on an integration (for ex. Amplitude)
- Add specific requirements
undefinedundefined - Repeat for various attributes
- Repeat for each integration
Demo: Set up data connections using the mParticle user interface
Step 6: Create an Audience of high-intent users in mParticle
Now we’ll create an Audience of users who are likely to purchase that we can later target with personalized messaging based on their location. To create this Audience in mParticle, follow these steps:
- Click on “Audiences”
- Select “Create new audience”
- Name the audience
- Select data inputs (e.g. iOS, Braze, POS systems)
- Click Create
- Within the “Audience Builder” window, click “Add Criteria”
- Select “Event” and add the selection criteria for your audience
Demo: Create audiences in mParticle
Step 7: Set up a geofence with Radar
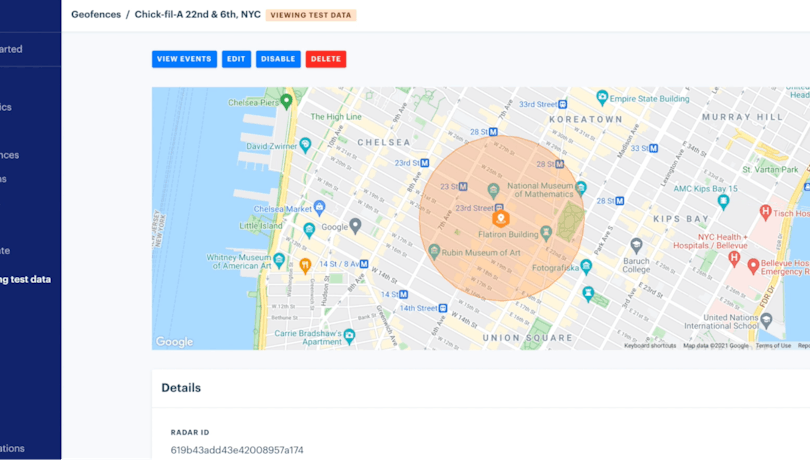
With our Audience of high-intent customers created in mParticle, we can now set up a geofence within Radar that will send an event to mParticle each time a user enters the radius we have specified. To do this, use the Radar UI to establish a center (latitude and longitude) and radius (e.g. 350 meters) for your geofence:

Step 8: Use Braze to send personalized messages to high-intent users within your geofence
With a high-intent Audience built in mParticle and a geofence established in Radar, we can forward this data to Braze to deliver real-time push notifications and offer emails to customers within our geofence. To accomplish this, do the following in the Braze UI:
- Create a new “Canvas,” and give it a name
- Set “Entry Schedule” to “Action-Based”
- Set “Perform Custom Event” to “user.entered_geofence” (event from Radar)
- Set “Entry Audience” to the high-intent audience audience from mParticle
- Build your Canvas by selecting a message and attaching an email body
Demo: Set up a Canvas in Braze
Step 9: Further refine and analyze your audience using Amplitude
Hurray! You are now successfully running a location-based engagement campaign by using mParticle to combine the functionalities of Radar and Braze. But why stop here? Let’s find new ways to segment our Audience, and run further analysis on the customers who are engaging with our offer, and figure out why those who don’t are passing it up.
To do that, we can send the portion of our high-intent audience that has entered our geofence to Amplitude. There, we can run a Funnel Analysis report to see how our the email and push response rates of change depending on other factors, run A/B tests and much more, all powered by the interconnected data forwarded from mParticle:
Demo: Refine and analyze your mParticle audience using Amplitude
Watch an end-to-end demo of this use case
Demo: Leverage mParticle's data connections to engage customers based on location

