Manage user consent with OneTrust
This guide will show you how to collect, store, and share customer data according to user consent choices and data management requests across your organization by integrating OneTrust and mParticle.
Overview
This article was updated on June 30th, 2021
Gaining and maintaining customers’ trust is critical to brands’ success. With new regulations in place on how brands can collect, store, and share customer’s data, creating or updating your consent management processes should be at the top of every product manager and marketer’s list. Misuse, or worse a breach, of customer data can hurt a company’s relationship with their customers and even incur fines. At the same time, you need to be able to use customer data in a compliant way to deliver impactful experiences throughout the customer journey. But getting new processes in place quickly and securely, especially ones that deal with complexities like identity resolution and data governance across systems, can be challenging.
A global media company was looking to manage identities across their 17 brands and respective technology partners, applying consent preferences across each of their digital touchpoints. Using OneTrust and mParticle, this global media company was able to become compliant within weeks of implementation. This workflow will show you how to collect, store, and share customer data according to user consent choices and data management requests across your organization by integrating OneTrust and mParticle.
Benefits
- Receive and apply consent permissions to customer profiles across your web properties
- Near real-time management of consent on a per-user, per-purpose basis
- Easily accessible proof of consent
- Role-based permissioning and advanced governance controls ensure customer’s data is only shared or accessed by approved team members and partners
How it works
OneTrust is a privacy management and marketing compliance solution that helps companies comply with data privacy regulations across sectors and jurisdictions, including the GDPR, CCPA, and ePrivacy. When customers visit your website, OneTrust launches a module with customizable consent preferences for both cookie and universal consent. Customers can then opt-in to dictate what information is collected and how it can be used. OneTrust collects these preferences and integrates them into your existing consent collection workflows to manage the entire lifecycle, from collection through withdrawal.
When OneTrust is integrated with mParticle, consent decisions made in the OneTrust UI are tied to persistent customer profiles in mParticle, and can then be used to control how, when, and where customer data is shared with partners in the mParticle integration ecosystem.
Once consent is logged, consent state properties can be viewed in the mParticle UI and provide proof of consent. For companies with many brands, OneTrust and mParticle’s consent management and data governance capabilities ensure that customers’ consent dictates who can access specific subsets of customers’ data, using role-based permissioning.
This integration is one-directional, with only OneTrust sending consent events to mParticle, so customer consent records are only changed when new customer consent decisions are recorded. Using mParticle’s GDPR and CCPA-compliant consent controls, and OneTrust’s cookie and universal compliance tools, you can control what data is collected, stored, accessed, and shared on a granular level, providing both you and your customers with a greater level of control over personal data.
Set up
Prerequisites: OneTrust configuration on your web app
Embed the mParticle Javascript SDK into your standalone web app
1. Create an API key by going to Setup, then clicking inputs in the mParticle dashboard. Select Web to generate your API key and secret.
2. In the development version of your web app, insert the code snippet, found in our repo here, and add in the API key you just generated.
3. Check the Live Stream in mParticle UI to ensure data is being sent to mParticle. If data does not populate in the Live Stream, refresh and check that you’ve entered the API key correctly, and that your config object contains isDevelopmentMode:true.
4. Enable the consent management features in mParticle by following these instructions. The purposes set for each workspace dictate the scope of data collection and processing allowed by GDPR / CCPA guidelines.
Enable the OneTrust integration
1. Enable the OneTrust integration by adding it from the mParticle directory
2. Connect your integration by going to the Connection Settings and mapping your OneTrust Cookie Groups to your mParticle consent purposes. Cookie Group IDs can be found in your OneTrust dashboard:
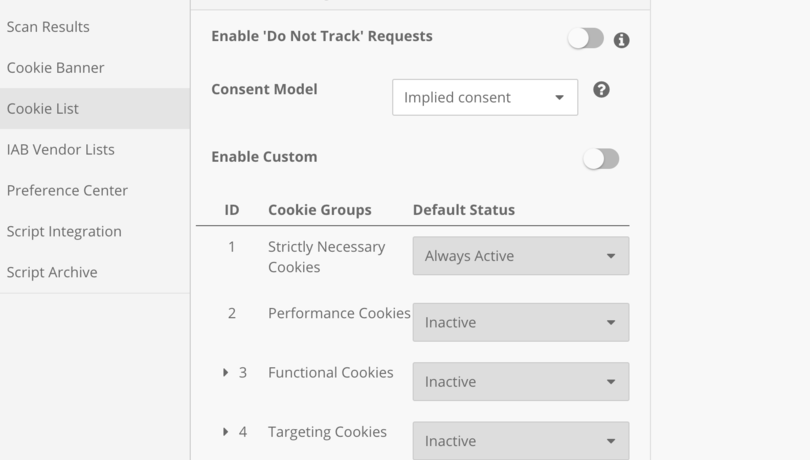
When mapped, your consent groups in mParticle should look like the example below. Note: Naming conventions for mapped consent groups (numerical in OneTrust) in mParticle based on the purpose like Marketing for Targeting can be helpful for identifying later on.
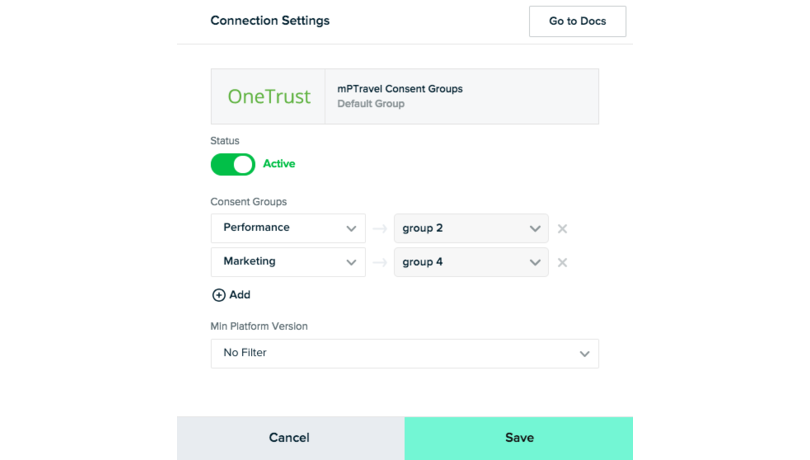
3. mParticle’s Javascript SDK will automatically check the OnetrustActiveGroups variable and will pull in the consent state for each mapped purpose. If a Cookie Group ID is listed, consent values will be set to true. If a Cookie Group ID is not listed, the consent values will automatically be set to false. Changes to the consent state will automatically update within mParticle, so you can be sure that you are only collecting and using customer data with consent.
Consent states can be used to create conditions for building audiences and forwarding rules, and consent states can also be forwarded to partners in the mParticle ecosystem. With consent states managed and distributed across your tech stack, you can better support compliance with data privacy and consent guidelines.
For example, for users who opt-out of CCPA’s “do not sell my data” requirement, you can create a forwarding rule to block the flow of data to partner integrations involved in the sale of customer data.
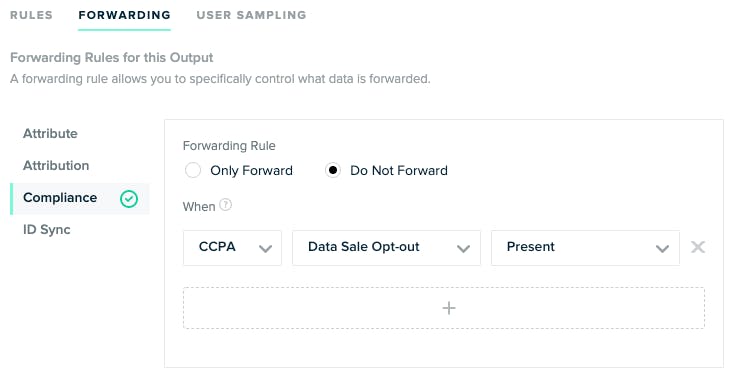
Similarly, depending on whether or not users have opted in for the collection of their data for “analytics” or “marketing” purposes, mParticle can control the flow of data sent to each downstream integration. You can read more about mParticle’s consent management capabilities by reading this guide in our docs.
Create an audience with consent parameters
1. Using Audience Builder, you can create an audience based on significant attributes, which can then be forwarded to your preferred marketing and business intelligence tools. mParticle’s identity resolution features will ensure that users’ consent states are added to the right customer profile along with information from any other profile inputs to target customers with the most relevant campaign messaging.
2. To create an audience, click on the Audiences tab in the in-app sidebar. Then click the "New audience" button. Name your audience, choose a date range, and select your web input.
3. Then add your criteria. To add consent criteria, go to the User section in Audience Builder and select Consent.
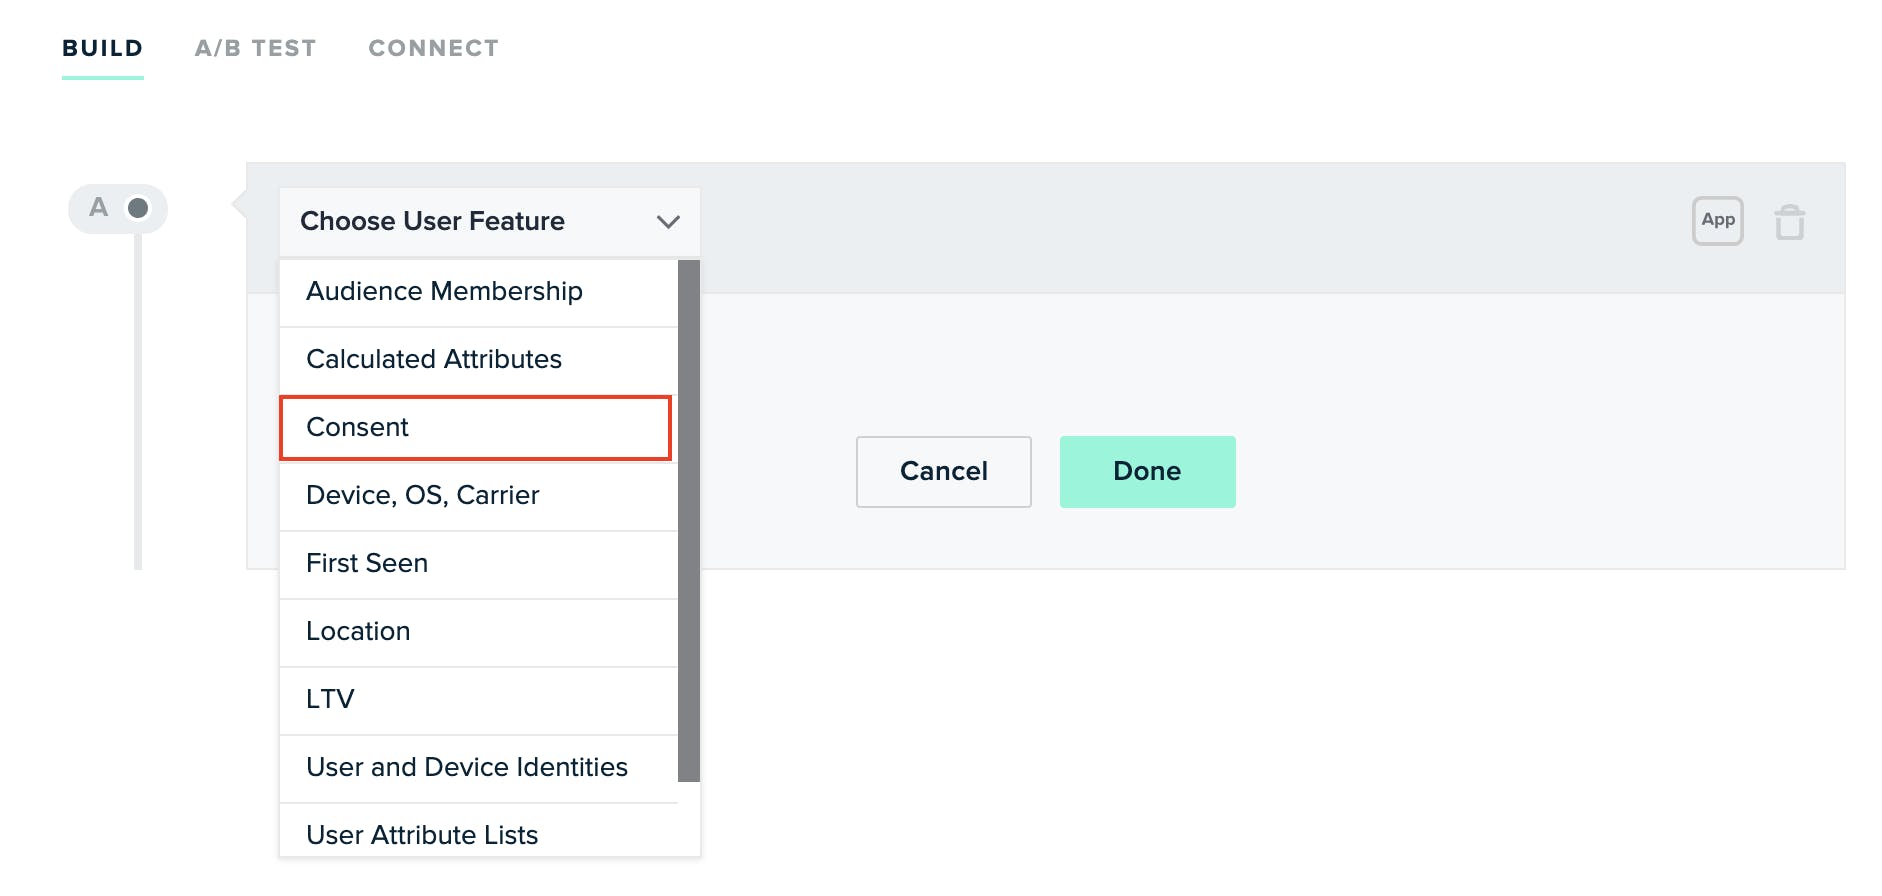
4. Then, select Purpose to choose which specific consent purpose you want to use and click done. You can find additional information on how to choose audience criteria here.
Here’s an example of an audience built with consent criteria that will only include users that have given GDPR opt-in consent for ‘Marketing’:

Forward your audiences to your preferred marketing and BI outputs
1. Set up an audience output by heading to the Directory in the sidebar and searching for your preferred marketing output to use to engage with your customers, like an email provider or a paid media channel.
2. Click the tile, then click the +Add {email provider or paid media or other tool} to Setup. Then, select Audience Output. Name your output and enter your configuration details to finish creating your output.
3. Lastly, connect your audience to your output by going to the Connect tab in the Audiences page and clicking Connect Output. Select your recently created output, then toggle to send your audience. You can create many outputs for the same audience by using Bulk Audience Connections.
4. You can then use your audience to populate an email list in your email provider's UI or a targeting list for your paid media channel without having to manually upload or update your list as customers’ consent states, attributes, or actions qualify or disqualify them from your Audience.
Try it!
If you’d like to learn more about how you can use OneTrust and mParticle to collect and manage your consent across your entire stack, you can see the docs here.

