Connect mobile and web data to Adobe Analytics
This workflow will show you how to use mParticle to collect user engagement data and attributes from your web and mobile/connected device properties and connect them to Adobe Analytics in a matter of minutes.

Overview
Adobe Analytics is an industry-leading digital marketing analytics solution for large enterprises seeking to understand and improve the customer experience across digital properties and platforms. With Adobe Analytics, marketers can understand prospect and customer acquisition and behavior, using these insights to optimize marketing campaigns.
This workflow will show you how to use mParticle’s hybrid integration and Javascript SDK to connect web and mobile data natively from your owned digital properties to Adobe Analytics.
While Adobe Analytics is tightly integrated with other parts of the Adobe Marketing Cloud, many brands want to leverage “analytics” data for more than just analytics, and across multiple different vendor partners. Additionally, many companies employ multiple analytics solutions and don’t want to install and maintain an SDK for each one. Companies using mParticle can send their data to multiple downstream systems, including Adobe for marketing analytics, with a single SDK implementation, establish universal governance controls, and gain a single view of their customers across every system.
Benefits
- Centralize data from digital properties
- Improve time to value for Adobe analytics
- Augment legacy analytics with 360° view of the customer
- Democratize data access for stakeholders
How it works
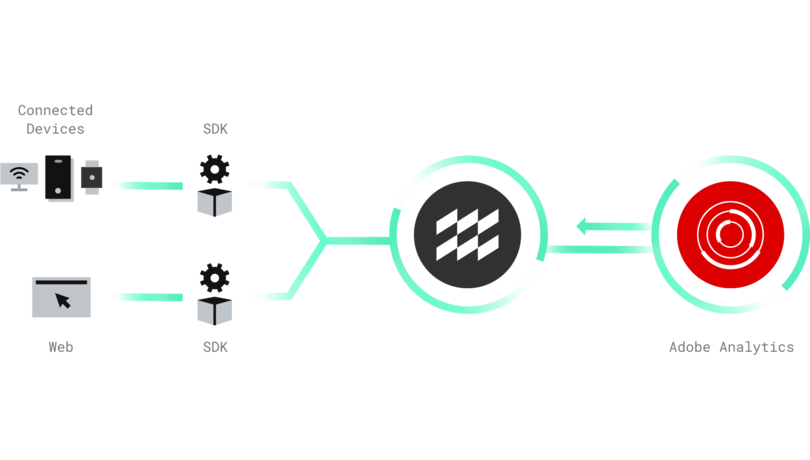
Adobe provides each user tracked with a Marketing ID (MID), which ties customers’ actions across digital properties, including mobile, connected devices, and web. mParticle uses the MID to collect user-specific data from web and mobile and ties them together by matching actions and attributes to the MID.
For the mobile data collection, mParticle supports Adobe Marketing Cloud’s Mobile Services through a combination of an embedded SDK and server-side forwarding. The SDK continually interfaces with Adobe’s Marketing Cloud ID service to retrieve the MID and maintain Adobe’s records up to date with identifiers. mParticle forwards data to Adobe Analytics server-to-server, including app lifecycle metrics, product events, lifetime value, opt-ins and opt-outs, location, offline data, and app and device attributes. Detailed event mappings can be found here for further context.
Collecting your web data is simple, thanks to mParticle’s Javascript SDK. Once your Javascript is enabled on your web properties and you set up the integration in the mParticle platform, the integration will load the Adobe javascript files to mParticle without the need for additional code. Events collected from web include page views, custom events, and eCommerce product events, including product incrementors and merchandising variables.
Once you have implemented both the mobile SDK and the Javascript SDK, event data from all connected digital properties will flow into mParticle and be forwarded for analysis in Adobe Analytics. Data and insights can be used across the Adobe Marketing Suite or to create audiences within mParticle for use with other service providers across your stack. With this single customer view across your properties, you can measure campaign effectiveness, contextualize and trigger messaging, and improve marketing and sales outcomes.
Set up
Implement your mobile SDK for Adobe v4.x:
1. Add the iOS or Android SDK to your app by following the instructions on the docs page here and retrieve your users’ MIDs.
2. Connect your mParticle iOS/Android workspaces to Adobe Marketing Cloud using your Marketing Cloud Organization ID, your reporting suite IDs, and your tracking server variable. Tracking server variables can be created as a value by following this Adobe doc or by creating a CNAME record in your domain pointing to Adobe’s servers as detailed here. Tracking server variables determine which regional data center your data is sent for storage.
3. Map the events in that you want to track by following the Event/Attribute structure detailed in the Adobe Mobile docs.
Embed the Javascript SDK for your standalone web app.
1. Create an API key by going to Setup, then clicking inputs in the mParticle dashboard. Select Web to generate your API key and secret.
2. In your development version of your web app, insert the the code snippet, found in our repo here, and add in the API key you just generated.
3. Check your Live Stream to ensure data is being sent to mParticle. If data does not populate in the Live Stream, refresh and check that you’ve entered the API key correctly, and that your config object contains isDevelopmentMode:true.
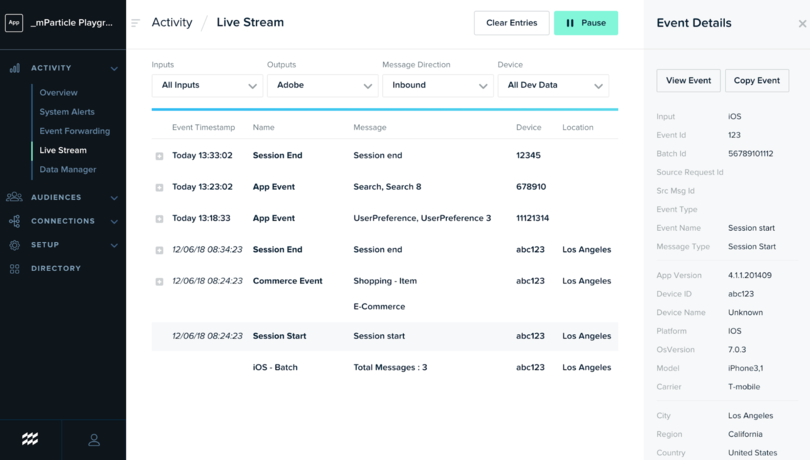
Enable the Adobe integration for web in mParticle
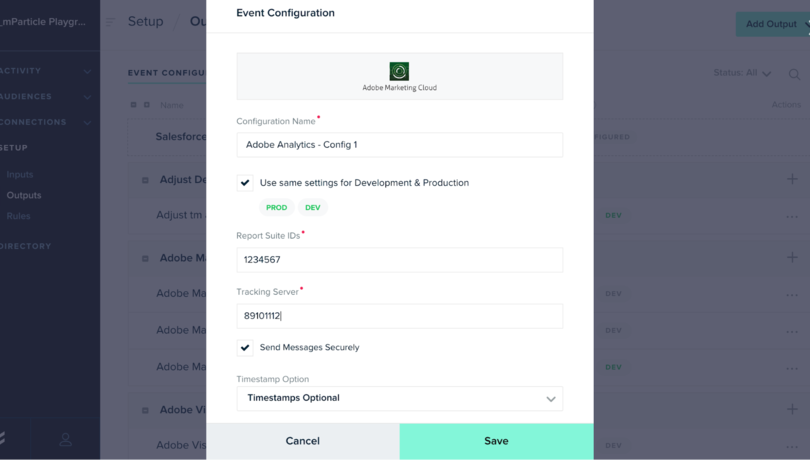
1. Go to Setup and select “Add Output,” then search for Adobe Marketing Cloud.
2. Select Adobe Marketing Cloud and enter your configuration name, report suite IDs, and tracking server and save.
3. Then, go to Connections and select JS Web as your input and your Adobe configuration as your output.
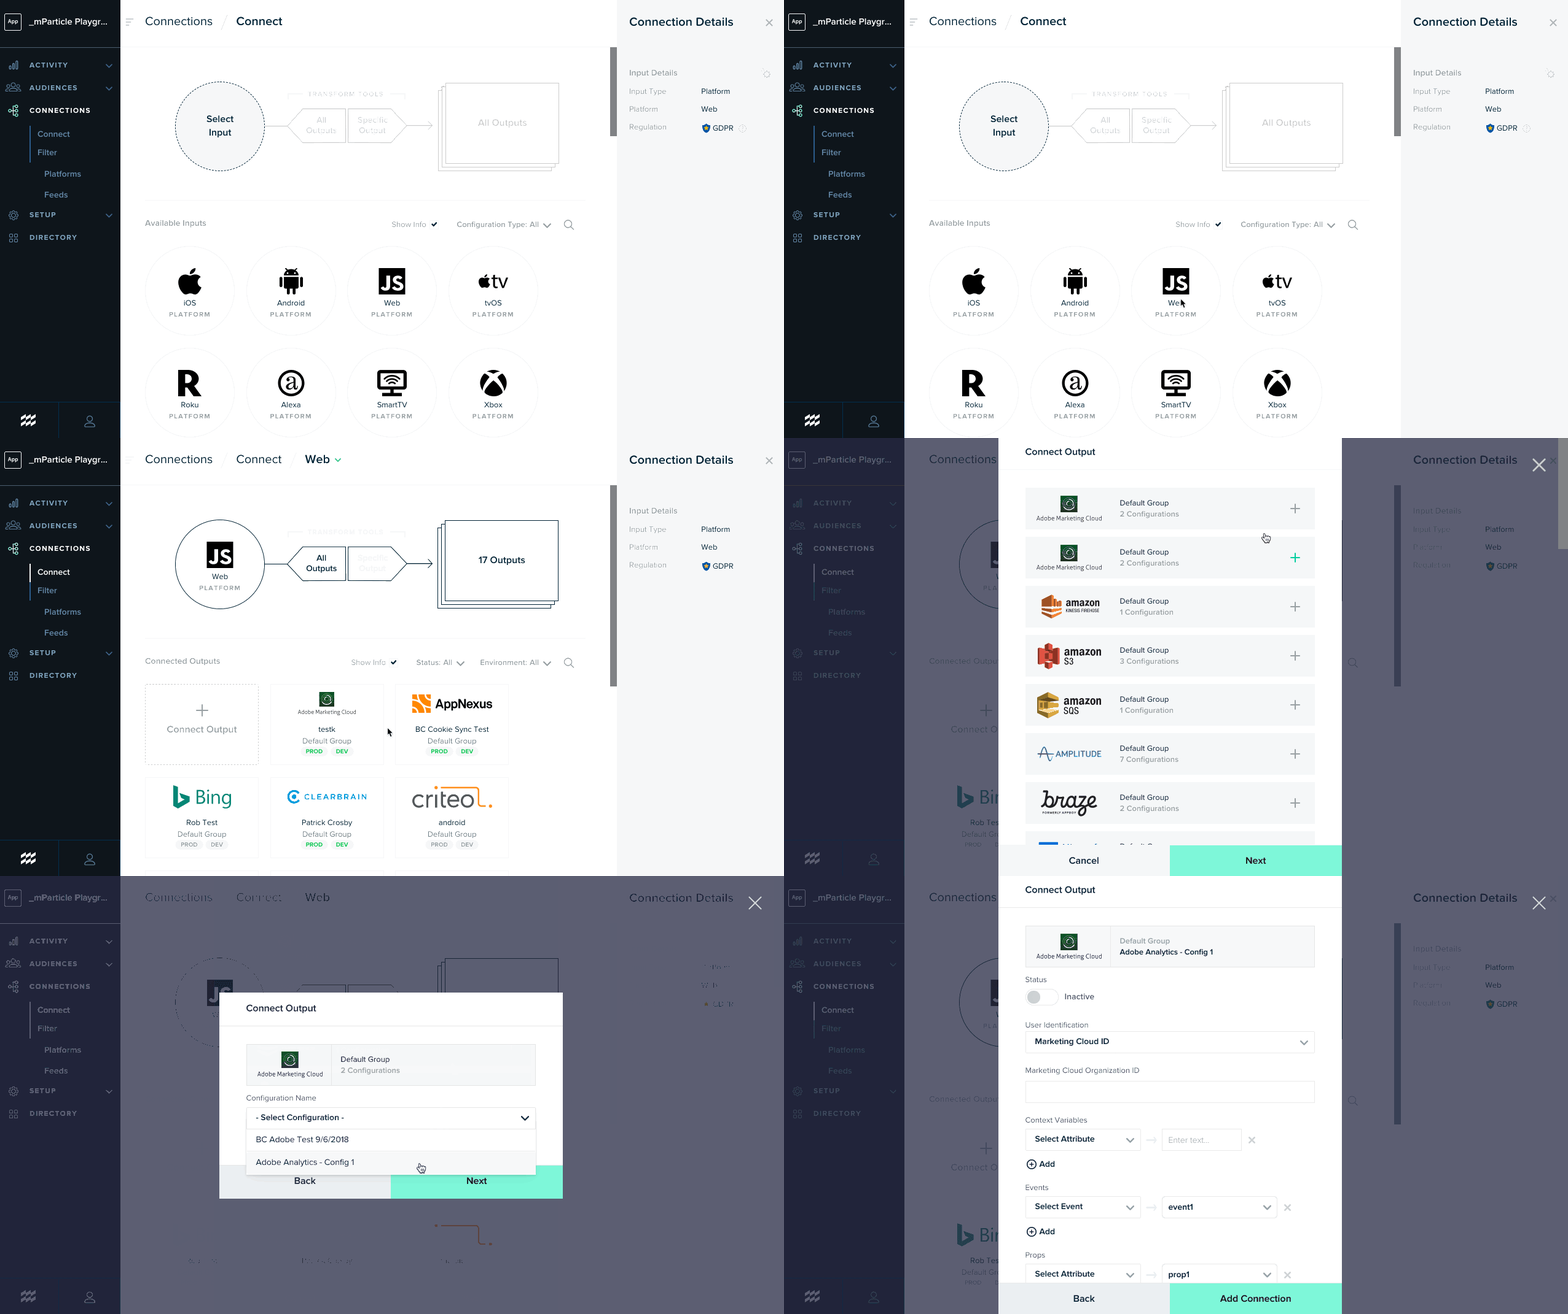
4. Enter your Marketing Cloud Organization ID and add the context variables and events that you would like to measure in Adobe. These variables and events must match the Adobe EVars (conversion variables) and properties set up in your Adobe Report Suite Manager for them to be connected. You can set these by going to the edit settings tab in your Adobe Report Suite Manager. Then, toggle status to active and click “Add connection.”
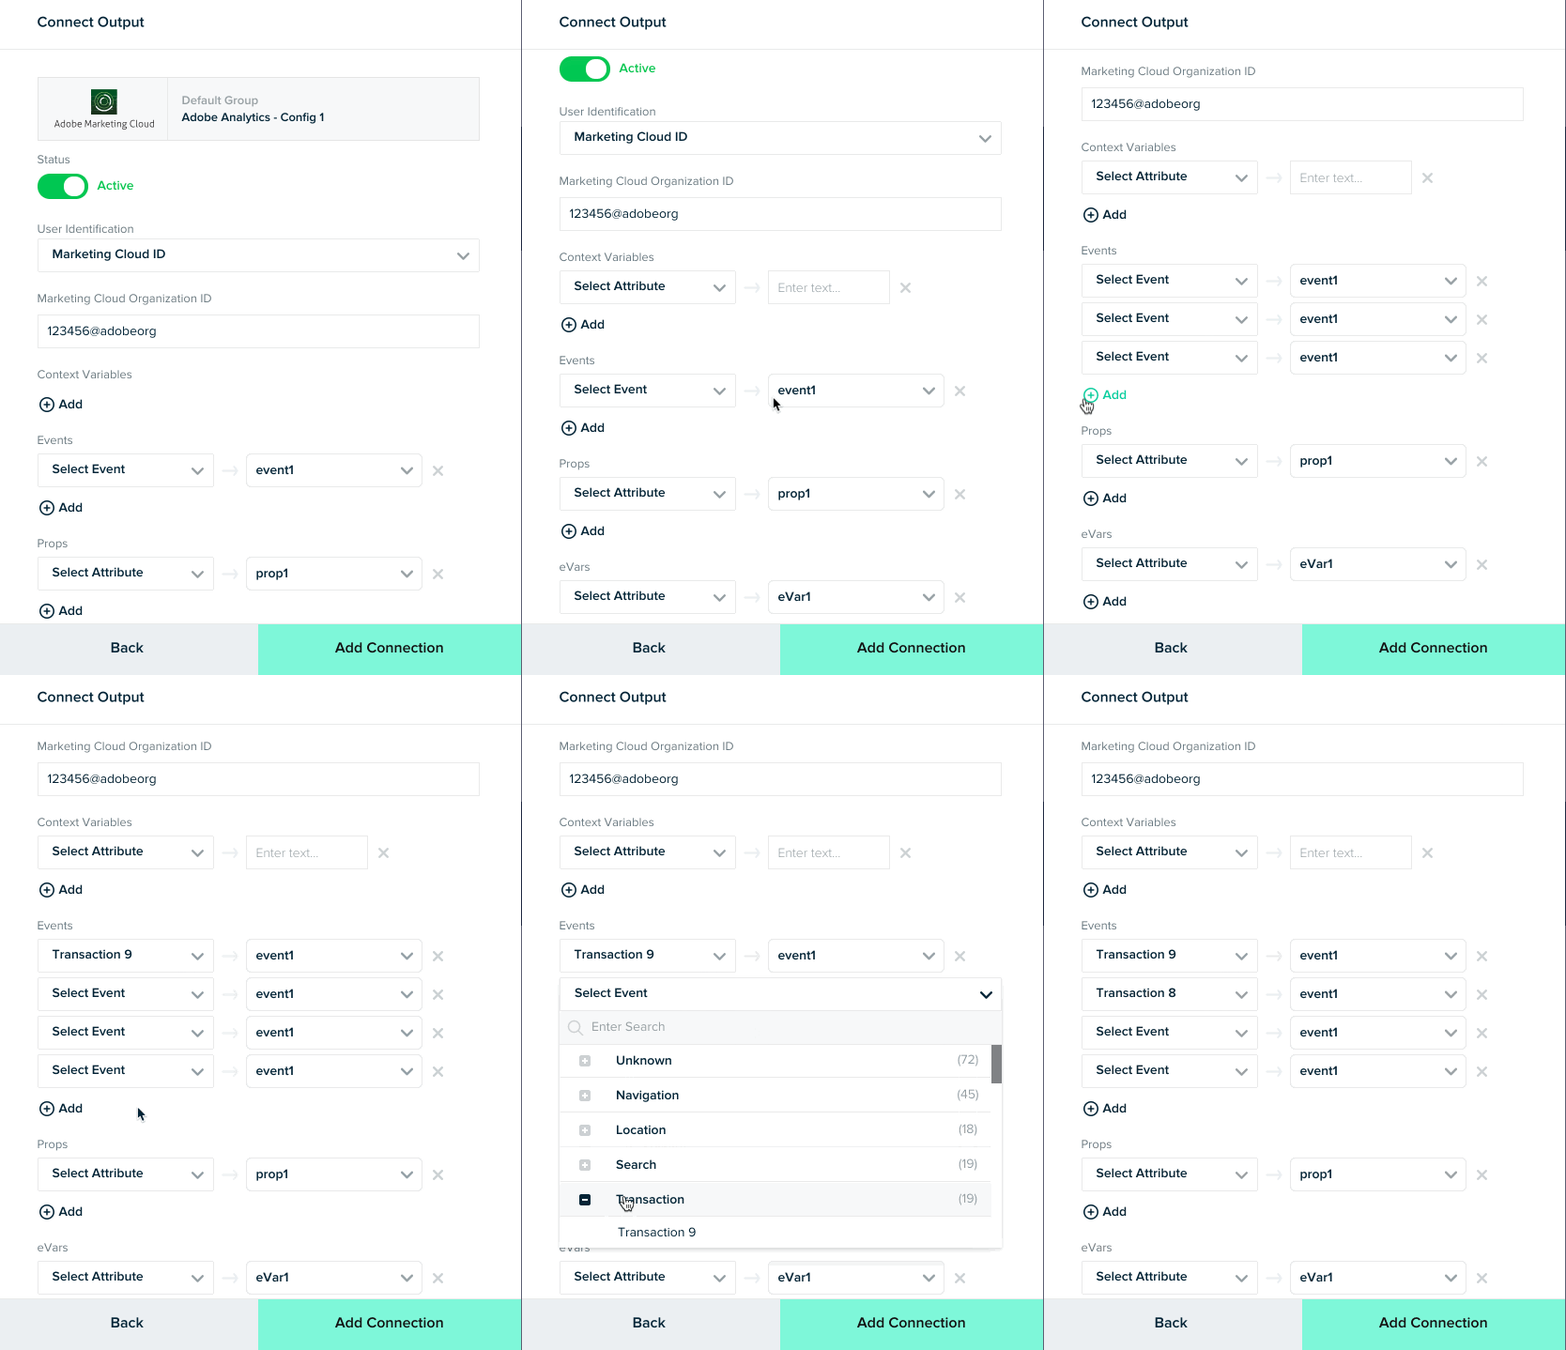
Once you have finished setting up your mappings, you should be able to see your web events stream into the Adobe Reports tab. You can toggle between different event mappings to see what data is being sent to Adobe through mParticle. With your data flowing into mParticle and into Adobe, you can easily use it across the Adobe Marketing Cloud suite and analyze it using Adobe Analytics to power your marketing and optimization. With mParticle, you can also forward your mobile and web data to other service providers you may be using.
Try it
If you’d like to learn more about how you can connect your owned digital properties to Adobe Marketing Cloud, you can try this workflow by clicking below or getting in touch.

