How to harness the power of a CDP for machine learning: Part 2
Get a step-by-step guide to activating ML insights with mParticle and Amazon Personalize in part two of this three-part series.

In part one of this series, we discussed the three major infrastructure challenges posed by machine learning, and how a CDP can help to solve them. To show you what integrating machine learning into a CDP can look like, I'm going to work through a complete example, using mParticle and Amazon Personalize to implement personalized product recommendations for my made-up store: Items4U.
The use case: Personalized product recommendations
Items4U ("The finest items, which you will particularly enjoy"), operates a retail business across it's website, native iOS and Android apps, and network of brick-and-mortar stores throughout the country. Our challenge is that the sheer number of items we offer can make the shopping experience on our apps feel a little scattershot. I want to use ML to figure out which products I should focus on surfacing for each user.
By the end of this tutorial, I'll have set up a mechanism to deliver personalized product recommendations to each user, which will automatically continue to grow and improve over time.
At a high level, the data flow looks like this:
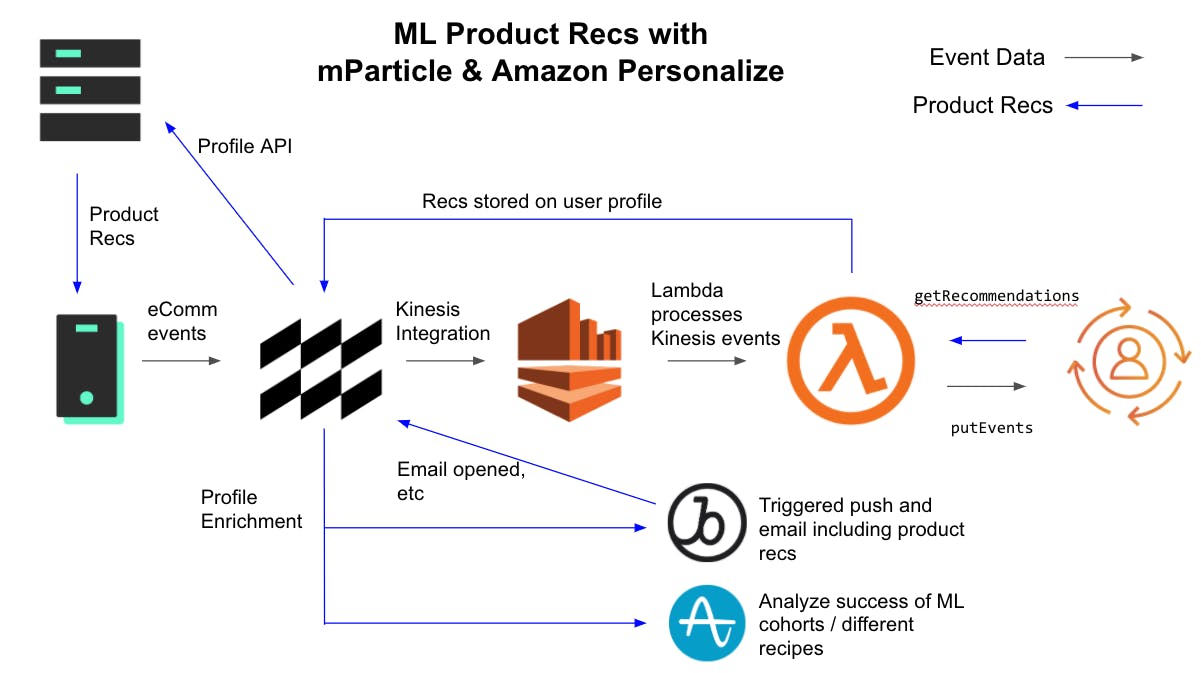
- mParticle collects commerce data from my website, apps and stores. Each action is attributed to a master mParticle User ID and forwarded on to Amazon, using Amazon’s Kinesis streaming service.
- An AWS Lambda function converts the data into a format that can be used to train ML models and uploads it to Amazon Personalize.
- The same function requests custom product recommendations from Amazon Personalize, and uploads the recs back to a master customer profile in mParticle.
- The mParticle customer profile powers personalization on the Items4U website and apps, as well as making the same information available in my messaging and analytics platforms.
There’s a fair amount of busy-work to go through in order to set up the AWS assets we need, but the good news is that most of it can be automated for subsequent iterations. For this reason, I’m using the AWS CLI and other scripting-friendly tools wherever possible. In this post, we’ll walk through how to:
- Collect commerce event data through mParticle (prerequisite)
- Create a Kinesis Stream and start streaming event data from mParticle
- Create a Personalize dataset group
- Create an AWS Lambda function to load data into my Personalize dataset group until I have enough data to train an ML model
- Create a Personalize campaign
- Update my Lambda function to request recommendations for each customer and store the recommendations on mParticle’s customer profile
Collect data with mParticle
To train an ML model to give product recommendations, I need data about how my customers interact with products. Fortunately, I don't have to start from scratch just for ML. Capturing commerce data is a core function of mParticle, and by the time a retail brand like Items4U is ready to explore ML, the required data is already being captured and used for more basic use cases, like app analytics, segmentation and re-targeting.
When ready to begin integrating ML with mParticle, I've already:
- Set up inputs to collect data from the following channels: iOS, Android, Web, Custom Feed (Point of Sale), Custom Feed (Amazon Personalize)
- Added mParticle's client-side SDKs to my iOS, Android and Web apps, and configured my point-of-sale platform to forward purchase events to mParticle using the NodeJS server-side SDK.
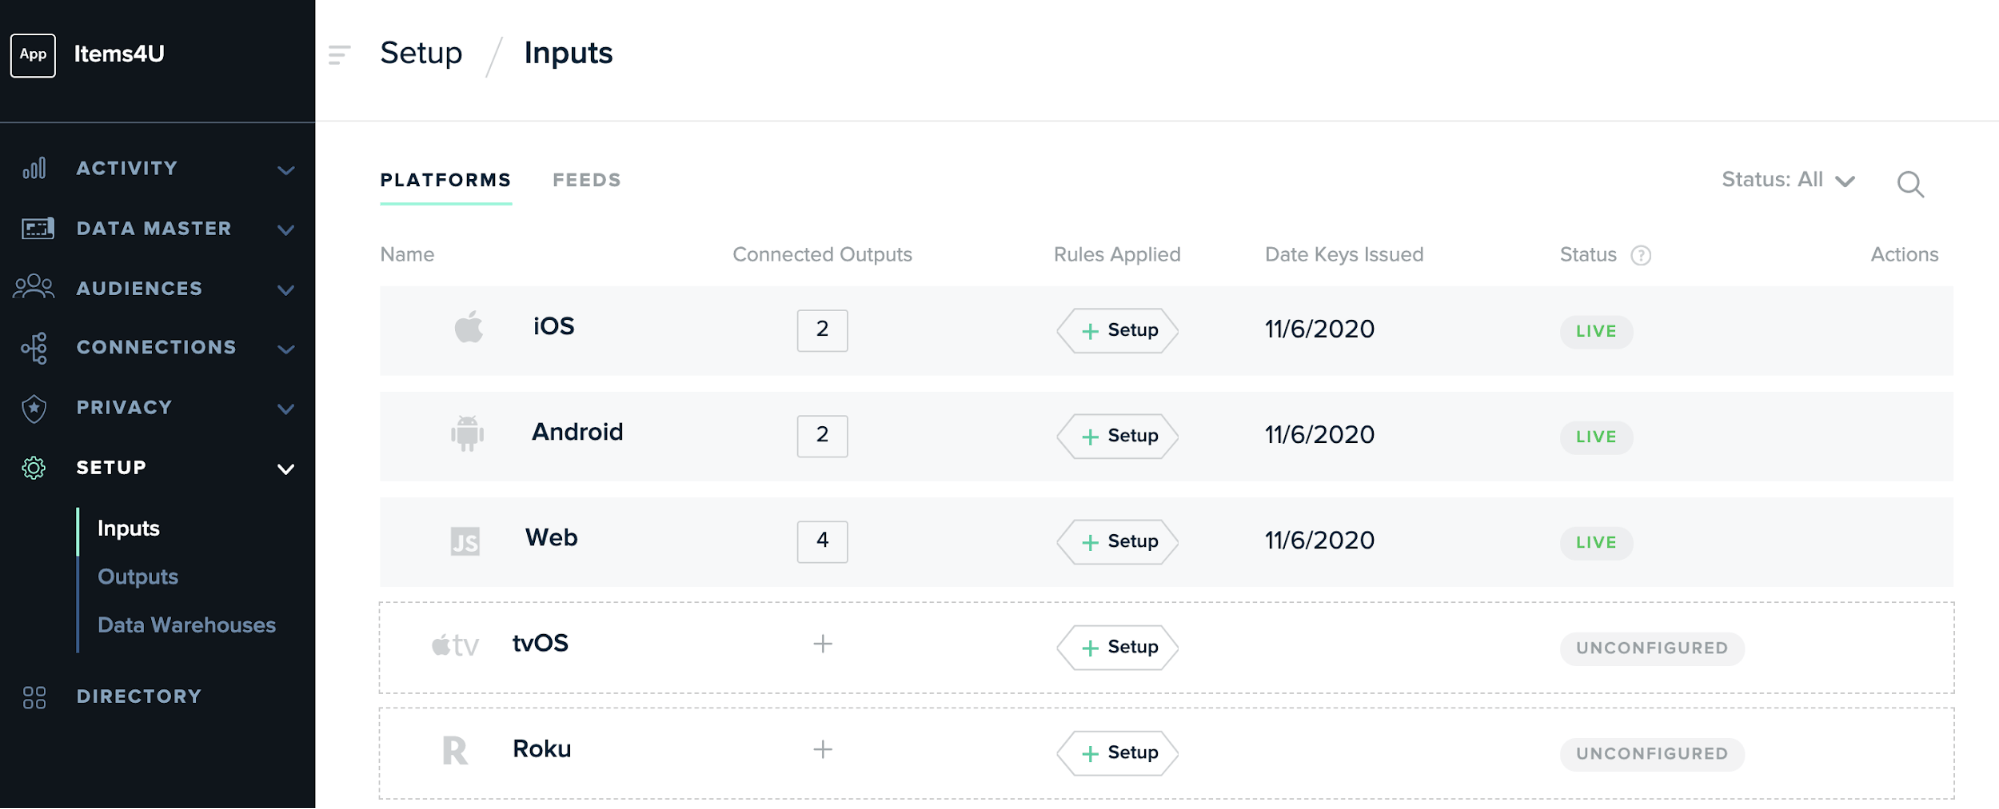
You can check out the mParticle Developer Docs for details on getting started with any of our client or server-side SDKs.
Capture product interactions
mParticle uses a single standard schema for capturing commerce events, and this schema is enforced by the SDKs. This means I don't have to rely on individual developers on each platform picking the right event names. To my ML model, a purchase made through the iOS app will look the same as a purchase made on the website, or in-store. For example, here's how a developer would log a purchase on my web app.
// 1. Create the product
var product = mParticle.eCommerce.createProduct(
    'Skateboard', // Name
    'prsx-10',    // SKU
    100.00,       // Price
    1             // Quantity
);

// 2. Summarize the transaction
var transactionAttributes = {
    Id: 'some-transaction-id',
    Revenue: 100,
    Tax: 9
};

// 3. Log the purchase event;
mParticle.eCommerce.logProductAction(
    mParticle.ProductActionType.Purchase,
    [product],
    null, //optional custom attributes would go here
    null, //optional custom flags would go here
    transactionAttributes);
What mParticle will forward on to downstream services, like my ML model (stripped down to just the fields we care about), will look like this:
{
    "mpid" 761556044463767215, // master user identity
	"environment": "production",
	"user_identities": {
		"email": "user99@example.com"
	},
	"user_attributes": {
		"$firstname": "Milo",
		"$lastname": "Minderbinder"
	},
	"events": [{
		"data": {
			"product_action": {
				"action": "view_detail", // Others actions are "add_to_cart", "remove_from_cart", and "purchase"
				"products": [{
					"id": "prsx-10", // Product SKU
					"price": 100
				}]
			},
			"timestamp": 1604695231872
		},
		"event_type": "commerce_event"
	}]
}
Identity Resolution
Ideally, my product interaction data is linked to a customer ID that works on my website, on my mobile apps and in-store. For me, that's the mParticle ID (MPID). mParticle's identity resolution allows me to gradually build up identities for each channel and resolve those identities to a single MPID.
For example: when a customer visits the website for the first time, I can link a cookie ID to the MPID. If the customer creates an account, I can add an email address, and perhaps a phone number. If they make an online purchase, I can add a secure hash of their credit card number. This means that if the same person then makes a purchase in a physical store with the same credit card, I can attribute that purchase to the same customer profile.
This process lets me train my ML models based on a complete set of customer interactions.
Create the AWS assets
For this use case I need to bring together mParticle and four AWS services:
- A Kinesis stream receives events from mParticle
- A Personalize campaign creates product recommendations
- A Lambda function acts as a broker. It transforms data from mParticle into a format accepted by Personalize, and uploads product recommendations back to mParticle.
- IAM controls access and permissions for the other components.
These services can be configured in the AWS UI, but I'll be using Amazon's CLI tool. This way, I can reuse my work by creating a script to quickly spin up future iterations. I've followed Amazon's documentation to create an IAM user with access to the above four systems and log in to the console.
As I go, I’ll need to save the Amazon Resource Number (ARN) for each asset I create. I’ll need these ARNs to set up interactions between the different resources I create.
Create a Kinesis Stream
Kinesis is a tool for processing streaming data. mParticle will forward commerce event data to Kinesis, where it will be picked up by the Lambda function I'll set up later.
1. Create the Stream
aws kinesis create-stream \
    --stream-name Items4UCommerceEventStream \
    --shard-count 1
Save the `StreamARN` from the response.
2. Create a role for mParticle to assume
For mParticle to be able to upload to the Kinesis stream, I need to create an IAM role for mParticle to assume. This role needs a policy allowing PutRecord access to Kinesis (sample), and a trust policy (sample) allowing mParticle to assume the role.
aws iam create-role --role-name mparticle-kinesis-role --assume-role-policy-document file:///path/to/mp-trust-policy.json

aws iam put-role-policy --role-name mparticle-kinesis-role --policy-name mp-kinesis-put --policy-document file:///path/to/mp-kinesis-role.json
3. Connect mParticle to Kinesis.
mParticle offers an "event" output for streaming event data to Kinesis in real time. This can be set up and controlled from the mParticle dashboard without writing code. You can read an overview of event outputs in the mParticle docs.
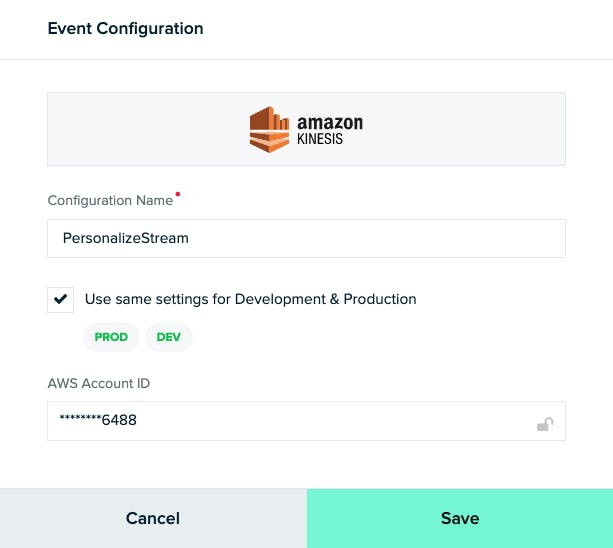
a. Create configuration
First, I need to create an overall configuration for Kinesis. This holds all the settings that will remain the same for every input I connect. Each mParticle integration requires different settings. For example, API keys are commonly required. For Kinesis, I've already granted mParticle write access using IAM, so I only need to provide my AWS account number here.
b. Connect all sources
Now I need to connect each of my four inputs: iOS, Android, Web and POS, to Kinesis.
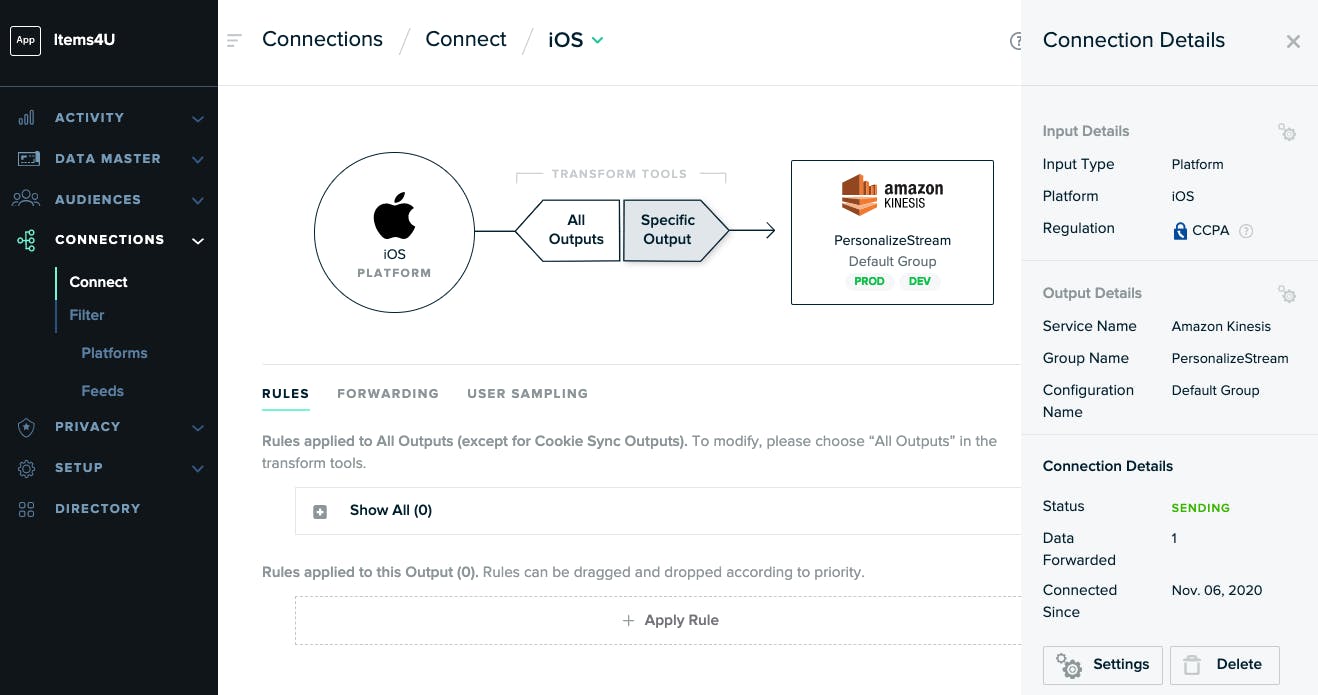
The settings I need to provide here are the Amazon Region (us-east-1) and the name of my stream.
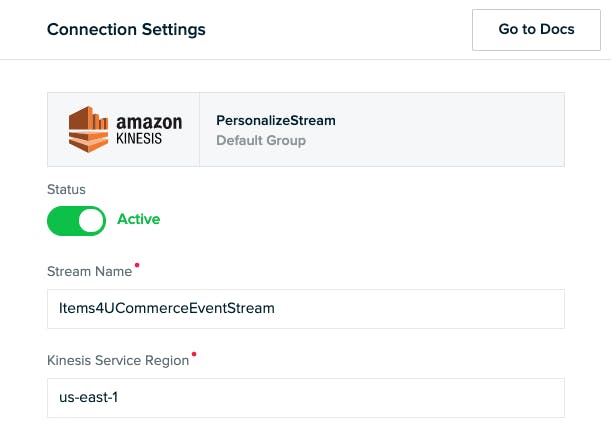
c. Set filters
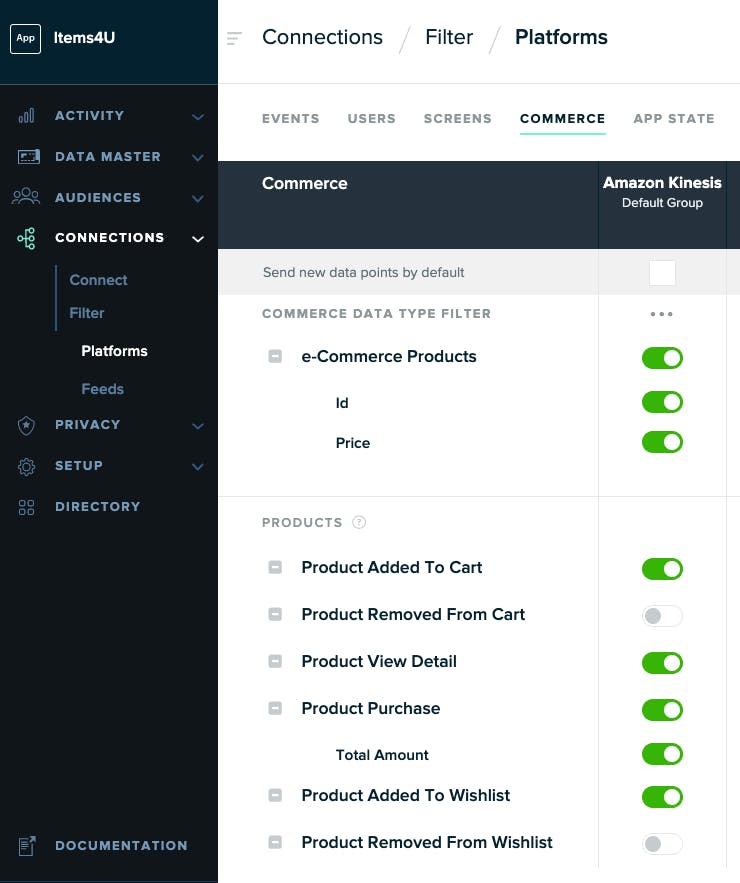
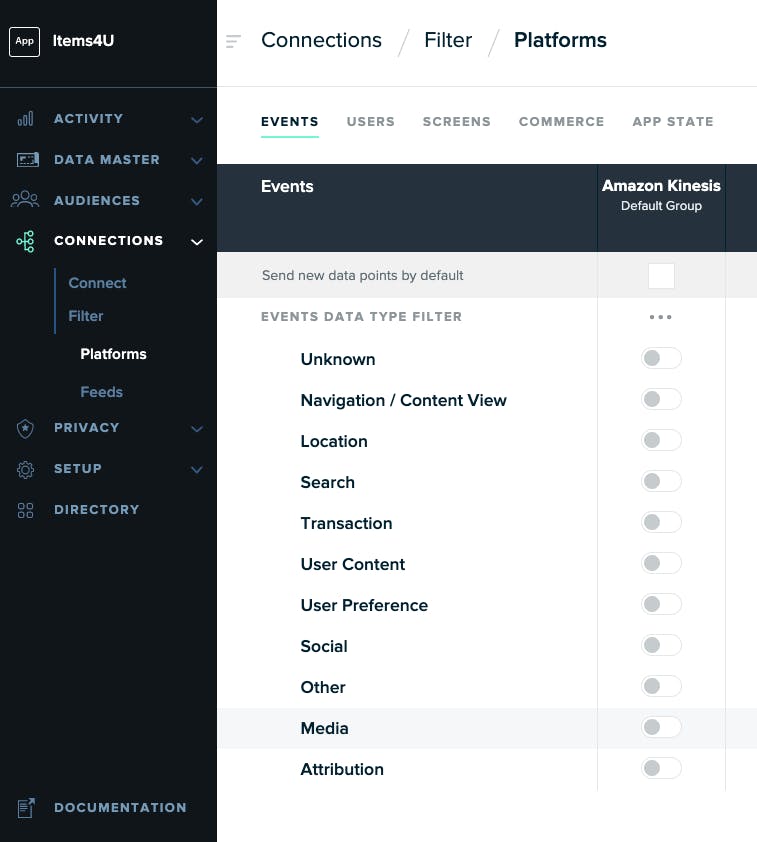
mParticle lets me switch each individual event name on or off for a particular output, like Kinesis. These settings help me save costs by making sure I'm only sending to Kinesis the data that I need to train my ML model. I'm interested in 4 types of commerce events:
- Add to cart
- Add to wishlist
- Purchase
- View detail
In my filter settings, I leave these four events on, and turn everything else off.
Create a Dataset Group
Now, I'm streaming events from mParticle to Kinesis, hurrah! But Kinesis is only a staging area. From here, I need to load them into an Amazon Personalize Dataset Group.
A Dataset Group is an overall container for a set of user data that can be used to train an ML model.
aws personalize create-dataset-group --name Items4UCommerceEventsSave the `datasetGroupArn` from the response.
Create a schema, dataset, and tracker
A Dataset Group can include up to three datasets:
- Items: Contains detail about products, including price, category, color, etc.
- Users: Contains detail about customers, like age, location, gender, etc.
- Interactions: Details interactions between users and items. For example, a user viewing a product, purchasing it, or adding it to a cart or wishlist.
Only the Interactions dataset is required, so to keep things simple it's the only one I'll use. I can come back later and improve future iterations of my model by adding other datasets.
Before I can create the dataset, I need a schema. A schema defines the shape of the data that makes up the dataset. Different ML recipes require different datapoints. For this example, I need the following elements:
- User ID - this will be the mParticle ID
- Session ID - mParticle automatically creates a unique ID for each session, which I can use.
- Item ID - this will be the SKU of the product
- Event Type - this will be the type of product interaction: Add to Cart, Add to Wishlist, Purchase, or View Detail.
- Timestamp - time of the interaction. mParticle automatically records a timestamp for each interaction.
As a Personalize JSON schema, it looks like this:
{
	"type": "record",
	"name": "Interactions",
	"namespace": "com.amazonaws.personalize.schema",
	"fields": [
		{
			"name": "USER_ID",
			"type": "string"
		},
		{
			"name": "SESSION_ID",
			"type": "string"
		},
		{
			"name": "ITEM_ID",
			"type": "string"
		},
		{
			"name": "EVENT_TYPE",
			"type": "string"
		},
		{
			"name": "TIMESTAMP",
			"type": "long"
		}
	],
	"version": "1.0"
}
1. Create the schema:
aws personalize create-schema \
  --name Items4UCommerceEventSchema \
  --schema file:///path/to/items4u-commerce-event-schema.json
Save the `schemaArn` from the response.
2. Create the dataset:
aws personalize create-dataset \
  --name Items4UCommerceEventsDataset \
  --schema-arn {{saved schema arn}} \
  --dataset-group-arn {{saved dataset group arn}} \
  --dataset-type Interactions
Save the `datasetArn` from the response.
3. Create the tracker
A tracker is an ID linked to the dataset that lets me upload events.
aws personalize create-event-tracker \
    --name Items4UCommerceEventTracker \
    --dataset-group-arn {{saved dataset group arn}}
Save the `trackingID` from the response.
Train the model
In order to train a Machine Learning solution, I need at least 1000 records in my dataset. One way to do this is to upload CSVs of historical events. mParticle integrates with several Data Warehouses, including Amazon Redshift. If I have access, I can easily create a training set from my past data. The CSV would look something like this:
USER_ID,EVENT_TYPE,ITEM_ID,SESSION_ID,TIMESTAMP
761556044463767215,view_detail,prsx-23,Q8bQC4gnO8J7ewB,1595492950
-6907502341961927698,purchase,prsx-14,VA9AUJBhoJXAKr7,1595492945
However, training the model on historical data is not strictly required, and since data warehouse access is often tightly controlled, this step can be a huge bottleneck in attempts to implement ML.
An alternative way to train the model is simply to start forwarding real-time event data as it comes in. To do this I need to set up my Lambda function.
Eventually, the function will perform three tasks every time a new event is received at my Kinesis stream:
- Transform the mParticle data into my Interactions schema, and upload it to my Personalize dataset.
- Call my Personalize Campaign and ask for updated product recommendations for the user.
- Use the mParticle API to store the updated recommendations on the mParticle user profile.
However, since I can't create a Personalize Campaign until I can train a Solution, this first version of the Lambda performs only the first task, while I collect the minimum 1000 events.
Lambdas can use several different languages and runtimes. I'll use Node for mine. The first version looks like this:
// Import Dependencies
const AWS = require('aws-sdk');
const JSONBig = require('json-bigint')({storeAsString: true}); // needed to parse 64-bit integer MPID

// Define the product actions we want to report to Personalize
const report_actions = ["purchase", "view_detail", "add_to_cart", "add_to_wishlist"];

// Initialize Personalize
const personalizeevents = new AWS.PersonalizeEvents({apiVersion: '2018-03-22'});

exports.handler = (event, context) => {
    for (const record of event.Records) {
        // Parse encoded payload
        const payload = JSONBig.parse(Buffer.from(record.kinesis.data, 'base64').toString('ascii'));

        // Extract required params
        const events = payload.events;
        const mpid = payload.mpid;
        const sessionId = payload.message_id;
        const params = {
            sessionId: sessionId,
            userId: mpid,
            trackingId: process.env.TRACKING_ID
        };

        // Get interactions from events array
        const eventList = [];
        for (const e of events) {
            if (e.event_type === "commerce_event" && report_actions.indexOf(e.data.product_action.action) >= 0) {
                const timestamp = Math.floor(e.data.timestamp_unixtime_ms / 1000);
                const action = e.data.product_action.action;
                const event_id = e.data.event_id;
                for (const product of e.data.product_action.products) {
                    const obj = {
                        itemId: product.id,
                    };
                    eventList.push({
                        properties: obj,
                        sentAt: timestamp,
                        eventId: event_id,
                        eventType: action
                    });
                }
            }
        }
        if (eventList.length > 0) {
            params.eventList = eventList;
            // Upload interactions to tracker
            personalizeevents.putEvents(params, function(err) {
                if (err) console.log(err, err.stack);
                else console.log(`Uploaded ${eventList.length} events`)
            });
        }
    }
};
1. Create the IAM role
As before I need to create an IAM role to grant my Lambda function the permissions it needs to access Kinesis and Personalize.
The necessary trust policy can be found here.
aws iam create-role \
  --role-name items4u-lambda-personalize-role \
  --assume-role-policy-document file:///path/to/lambda-trust-policy.json
Save the `Role.Arn` from the response.
I can use off-the-rack managed policies to grant access to Kinesis and Personalize:
aws iam attach-role-policy \
  --role-name items4u-lambda-personalize-role \
  --policy-arn arn:aws:iam::aws:policy/service-role/AWSLambdaKinesisExecutionRole

aws iam attach-role-policy \
  --role-name items4u-lambda-personalize-role \
  --policy-arn arn:aws:iam::aws:policy/service-role/AmazonPersonalizeFullAccess
2. Create the Lambda
To create the Lambda I need a zip file including the function itself, as well as it's dependencies in the node_modules folder.
I'll also need the mParticle API credentials for the Custom Feed I created for Amazon Personalize, and supply these as environment variables for the Lambda, as well as the Dataset Tracker ID.
aws lambda create-function \
    --function-name Items4UPersonalizeLambda \
    --runtime nodejs12.x \
    --zip-file fileb:///path/to/Items4UPersonalizeLambda.zip \
    --role {{role arn}} \
    --handler index.handler \
    --environment Variables="{MP_KEY=SomeAccessKey,MP_SECRET=SomeAccessSecret,TRACKER_ID=SomeTrackerID}"
3. Create an event-source mapping
Configure the Lambda to be triggered by new events received at the Kinesis stream.
aws lambda create-event-source-mapping \
    --function-name Items4UPersonalizeLambda \
    --event-source-arn {{Kinesis stream arn}} \
    --starting-position LATEST
Wait
By now, every time a commerce event is collected across any of my app platforms, mParticle is forwarding it to Kinesis. From here, the Lambda uploads the event to my Personalize dataset.
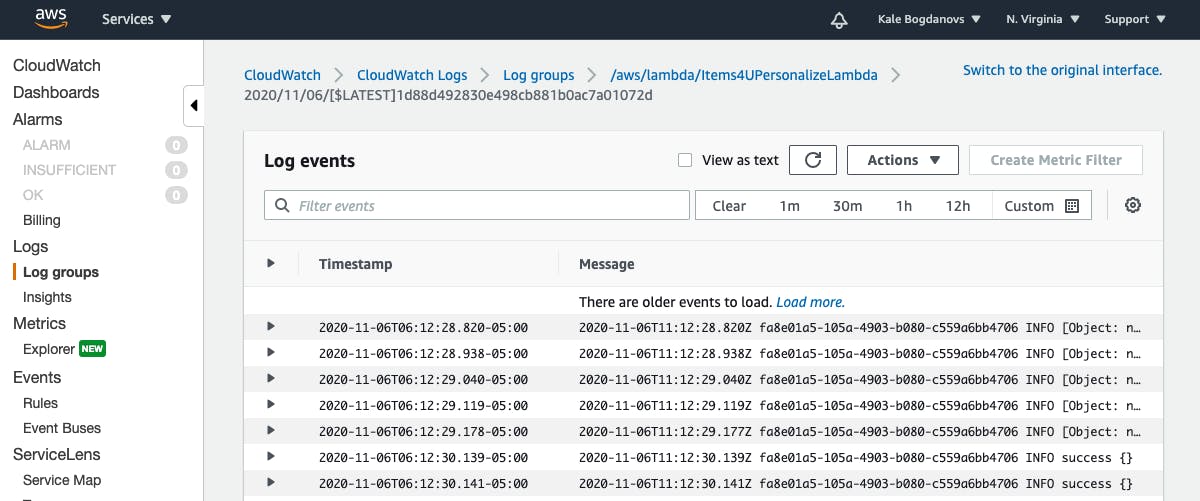
Now I need to wait to get at least 1000 records loaded. This can take some time. In the meantime, I can check the logs in AWS Cloudwatch to make sure the Lambda function is being invoked as expected.
Create an ML Campaign
A Personalize Campaign requires three components:
- A "Solution" which describes the particular ML recipe we want to use for the campaign. One dataset group can contain many solutions.
- A "Solution Version" is an instance of a Solution trained on a specific dataset.
- The "Campaign" is what will actually dispense product recommendations for a user.
1. Create a Solution
For this example I'll use Amazon's 'User Personalization' recipe.
aws personalize create-solution \
  --name Items4URecsSolution \
  --dataset-group-arn {{dataset group ARN}} \
  --recipe-arn arn:aws:personalize:::recipe/aws-user-personalization
Save the `solutionArn` from the response.
2. Create a Solution Version
aws personalize create-solution-version \
  --solution-arn {{solution ARN}}
Save the `solutionVersionArn` from the response.
The solution version takes some time to create. I can check in on its progress regularly with `describe-solution-version` until the response shows "status": "ACTIVE".
aws personalize describe-solution-version \
  --solution-version-arn {{solution version ARN}}
3. Create the campaign
aws personalize create-campaign \
  --name Items4UProductRecsCampaign \
  --solution-version-arn arn:aws:personalize:us-east-1:521255666488:solution/Items4URecsSolution/f58f24b6 \
  --min-provisioned-tps 1
Complete the Lambda
The final step is to update my Lambda function to request product recommendations from my new campaign, and send those recommendations back to mParticle. The updated Lambda looks like this:
// Import Dependencies
const AWS = require('aws-sdk');
const JSONBig = require('json-bigint')({storeAsString: true}); // needed to parse 64-bit integer MPID
const mParticle = require('mparticle');

// Define the product actions we want to report to Personalize
const report_actions = ["purchase", "view_detail", "add_to_cart", "add_to_wishlist"];

// Initialize Personalize and mParticle
const personalizeevents = new AWS.PersonalizeEvents({apiVersion: '2018-03-22'});
const personalizeruntime = new AWS.PersonalizeRuntime({apiVersion: '2018-05-22'});
const mp_api = new mParticle.EventsApi(new mParticle.Configuration(process.env.MP_KEY, process.env.MP_SECRET));

exports.handler = (event, context) => {
    for (const record of event.Records) {
        // Parse encoded payload
        const payload = JSONBig.parse(Buffer.from(record.kinesis.data, 'base64').toString('ascii'));

        // Extract required params
        const events = payload.events;
        const mpid = payload.mpid;
        const sessionId = payload.message_id;
        const params = {
            sessionId: sessionId,
            userId: mpid,
            trackingId: process.env.TRACKING_ID
        };

        // Get interactions from events array
        const eventList = [];
        for (const e of events) {
            if (e.event_type === "commerce_event" && report_actions.indexOf(e.data.product_action.action) >= 0) {
                const timestamp = Math.floor(e.data.timestamp_unixtime_ms / 1000);
                const action = e.data.product_action.action;
                const event_id = e.data.event_id;
                for (const product of e.data.product_action.products) {
                    const obj = {
                        itemId: product.id,
                    };
                    eventList.push({
                        properties: obj,
                        sentAt: timestamp,
                        eventId: event_id,
                        eventType: action
                    });
                }
            }
        }
        if (eventList.length > 0) {
            params.eventList = eventList;
            // Upload interactions to tracker
            personalizeevents.putEvents(params, function(err, data) {
                if (err) console.log(err, err.stack);
                else {
                    // Request product recs
                    var params = {
                        campaignArn: process.env.CAMPAIGN_ARN,
                        numResults: '5',
                        userId: mpid
                    };
                    personalizeruntime.getRecommendations(params, function(err, data) {
                        if (err) console.log(err, err.stack);
                        else {
                            console.log(`Uploaded ${eventList.length} events`)
                            // Upload product recs to mParticle
                            const batch = new mParticle.Batch(mParticle.Batch.Environment.development);
                            batch.mpid = mpid;
                            const itemList = [];
                            for (const item of data.itemList) {
                                itemList.push(item.itemId);
                            }
                            batch.user_attributes = {};
                            batch.user_attributes.product_recs = itemList;
                            const event = new mParticle.AppEvent(mParticle.AppEvent.CustomEventType.other, 'AWS Recs Update', {
                                product_recs: itemList.join()
                            });
                            batch.addEvent(event);
                            console.log(JSON.stringify(batch));
                            const callback = function(error, data, response) {
                                if (error) {
                                    console.error(error);
                                } else {
                                    console.log('Product Recs updated successfully');
                                }
                            };
                            mp_api.uploadEvents(batch, callback);
                        }
                    });
                }
            });
        }
    }
};
As well as updating the code, I also need to add the CAMPAIGN_ARN environment variable.
When I request recs from a Personalize campaign, I can specify the number of recommendations I want. Here, I'm going for a top 5 -- enough to populate a carousel or an email widget.
The payload uploaded to mParticle by the Lambda will look like this:
{
    "environment": "development",
    "mpid": "-6907502341961927698",
    "user_attributes": {
        "product_recs": [
            "prsx-4",
            "prsx-2",
            "prsx-15",
            "prsx-30",
            "prsx-28"
        ]
    },
    "events": [
        {
            "data": {
                "custom_event_type": "other",
                "event_name": "AWS Recs Update",
                "custom_attributes": {
                    "product_recs": "prsx-4,prsx-2,prsx-15,prsx-30,prsx-28"
                }
            },
            "event_type": "custom_event"
        }
    ]
}
This payload records the product recommendations in two ways:
- As an event, to record what the current recs were at a specific time.
- As a user attribute. User attributes are kept up-to-date for each user by mParticle as new data is received. mParticle enriches incoming data with a complete set of user attributes, so any user activities captured on any platform will include the current set of recs as context.
Next up
I've now set up a Machine Learning system that can generate a set of product recommendations for every user and update them each time the user interacts with a product. Unlike a model trained on a one-off CSV upload, mine will continue to get better over time as the results of successful and unsuccessful recommendations feed back into the model in a flywheel pattern.
In part three of this series, I'll explore some ways to put these recommendations to use, and to track how well my recommendations are doing.
